Tuesday, November 26, 2013

Flattening the ends of Dowels

I was working in my garage the other day when I ran into trouble. I wanted to make the end of a dowel I had just cut flat with a detail sander, but I could not do it. I kept getting a slight angle, and every time I tried to fix the angle, I would get one the other way. So I stepped back for a minute and came up with this jig.


The holes I drilled are the exact size as the dowels I need sanded.


I pounded the dowel into the jig...


and sanded it down to the face of the jig.


Now the dowel is perfectly flat at the end is sanded smooth.


Thursday, November 14, 2013

Tie Downs

Stop motion animation can be very tricky business. One of the first things you learn is that if a stationary object moves unintentionally, it is almost impossible to get it back to it's original position. There have been many times where I have had to reshoot a scene because I carelessly bumped a prop and could not reposition it. For this reason everything, and I mean everything, needs to be tied down or affixed to the set in some way.

There are several different options when considering tie down systems. There are straps, magnets, nuts & bolts, screws, glue, putty, specially designed rigs or even the objects weight can be enough to hold it down. I use a combination of all of them depending on the object itself.


Here is an example of a wing nut and bolt being used to tie down a tree prop. Make sure to use washers so you don't damage the the prop or stage when tightening the bolt.


This prop was made of paper so I couldn't bolt it down directly. I took a little piece of foam and put a bolt through that so it wouldn't rip the paper. I then used a wing nut to affix it to the stage.


This box had writing on the bottom so I couldn't just put a bolt there. I ended up taking a threaded rod, putting a 90 degree bend in it, and attaching it to the back of the box. In the photo above, I attached it to a park bench using a large washer and a wing nut.


I had previously put nuts in the bottom of the shoes of the main character. This allowed me to use threaded rods to hold down the feet. The rods are bent at the end to make it easier to screw them in. Because these rods will be moved multiple times, I am using plastic washers to limit the damage to the stage.


I use blu-tac putty to secure anything that can't be screwed down. I like blue color because it can be removed quite easily in post. The bottle in the photo below it affixed to the hand using blu-tac.


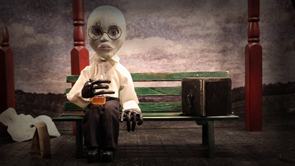
I used wood screws to secure the bench and the pillars. The white mask in the background is using it's own gravity to stay in place. It is made of plaster of paris and is actually very heavy. The backdrop is being held up by magnets so it can be changed out in a hurry.

Saturday, November 9, 2013

Sequel Part II

I have uploaded my new animation today, it's about a man and his box. You can find in under the Animations tab on top or follow the link.


Thanks for watching!

Tuesday, November 5, 2013

Simple Green Screen Butterfly

I made this animated butterfly for an upcoming project. I decided to build a larger model than what would appear on screen, shoot it in front of a green screen, and shrink it down in post. I thought this process would be easier than building a tiny model and trying to animate it on set. Also, this model needed to be suspended in mid air with wires and removing wires on a green screen is relatively easy to do. Although the process looks somewhat difficult, with the right software it is actually very simple.


I started with my model suspended on a wire. I have already removed the wire so it is not visible in this example. I animated the butterfly and brought the completed frames into After Effects.


In After Effects, I shrunk the butterfly down to about 5% percent of it's original size. I then animated the flight path simply by changing the butterflies position and adding keyframes along the timeline. You can change the curve of the path by dragging the bezier handles at the beginning and end of the path.


I removed the green screen with the Keylight 1.2 effect in After Effects. It is one of the easiest plugins to use. All you need to do is choose the color you would like to remove by selecting the eye dropper next to the "Screen Colour" swatch and choose the color you would like to remove from within your animation. There are several adjustment tools to play with to get the exact look you want.


I then added the background and changed the color from purple to yellow using the Photo Filter effect. I also adding a glow to enhance the light reflecting off of the wings.

Here is a video of the different stages of development.